Up Time VPN installation for Windows
Table of ContentsI. Quick Download Links (If you know what you are doing already! Otherwise skip to II: Prequisites)
The vpn-install.bat installer for Windows (will auto-detect Intel/AMD vs ARM/SnapDragon)
Approved OpenVPN version for Windows running on Intel/AMD64
Approved OpenVPN version for Windows running on Snapdragon/ARM64
II. Prerequisites
A. Windows 10 or later
B. Log in as the user who will use the VPN connection
C. Internet connection
III. Download and run the Up Time installer As Administrator
A. Download the Installer
B. Run the Installer - As Administrator
IV. Configure and download a VPN connection zip file on your Internet Security Firewall
A. Go to the web interface of your ISF.
B. Assign or Replace an Owner on a VPN Connection
C. Revoke/Replace the certificates/keys
D. Create a Connection Password!
E. Download and Unzip
V. Cleanup and VPN icon Configuration
A. Remove the zip and install files
B. Optionally Configure SysTray Icon
VI. Test the Connection
A. Connect to the Office
B. Disconnect if you are not actively using the VPN
II. Prerequisites
A. Windows 10 or later
Windows 10 is fully supported. Windows 8 has been mostly
abandoned by Microsoft and we can't support it. Additionally Windows 7
has hit End-of-Life as of January 2020, and has unpatched security holes.
We can no longer support Windows 7
B. Log in as the user who will use the VPN connection
We configure the specific profile of the currently logged in user.
Make sure you are logged in as the user who will be making the VPN
connection on the computer that needs the install. Note: as of March
2019, that user no longer needs to be a local administrator.
C. Internet connection
Verify that you are connected to the internet by browsing to a
known
reliable site
(news.google.com is good as it loads quickly and
it won't be a cached page).
Note: if you are currently plugged into the office network for
internet connection, we can install the VPN software, but will be
unable to test the connection as the VPN only works when you are
outside of the office (including outside the office WiFi). If you are
in the office, please test before need is mission critical by making
the VPN connection when you are home or at a cafe with WiFi,
etc. Please see below for how to test.
If any of these prerequistes are not met or you would like us to do
the install for you (which we can do over a remote session),
please call us at: 206-547-1817
III. Download the Up Time installer and "Run As Administrator"
A. Download the Installer
Up Time has written a simple installer that takes care of all but oneor two steps of the install. You can find the installer
at (you may want to RIGHT click the link below and choose "Save Link As" or similar):
Since a .bat file is considered dangerous to download from unknown
internet sites, your browser may warn you about it. Please proceed to
download it (don't run it out of your browser).
(Table of Contents)
B. Run the Installer "As Administrator"
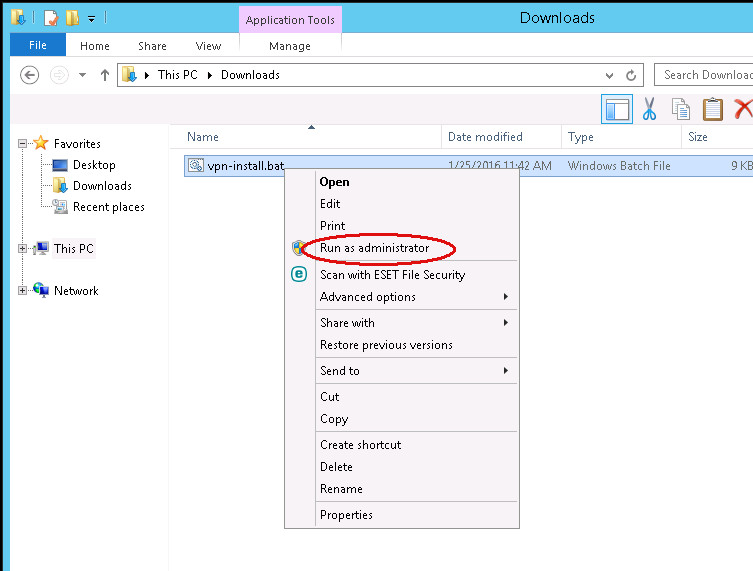
Right click the vpn-install.bat file in your Downloads folder and
choose "Run as Administrator" (it will need to make some changes to
your system to allow the installation of the VPN client), and follow
the directions. If for some reason the installer fails, it will give
you an error message and our phone number. Note the text of the error
message as that will help us pinpoint the issue and speed the fix.
Do note that during the install, with one exception, the default
answer is correct. The one exception is the installation of a virtual
network ("TAP") card. The default is to "Not Install". Please click
"Install" on that popup window.
If you need to reboot, the installer will tell you when it is
done. Please reboot as soon as is convenient (and save your work!) as
you will be unable to use/test the VPN until you do.
If the installer is successful, do note the directory where you will
unzip the connection certificates and keys (the installer will give
you the directory name if the install is successful, likely
C:\Users\username\OpenVPN\config, where "username" is the actual name
of the logged in user).
IV. Configure and download a VPN connection zip file on your Internet Security Firewall
A. Go to the web interface of your ISF.
If you don't know where to find the web interface to your firewall, orthe admin password to access it, please call us for support:
(206) 547-1817
B. Assign or Replace an Owner on a VPN Connection
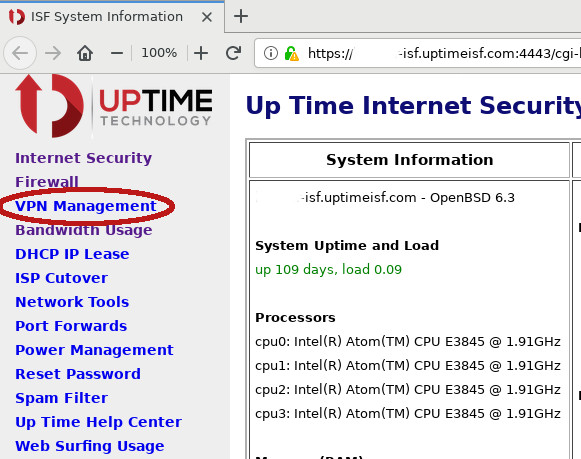
On the ISF interface, click on the VPN Management link on the left navigation
column.
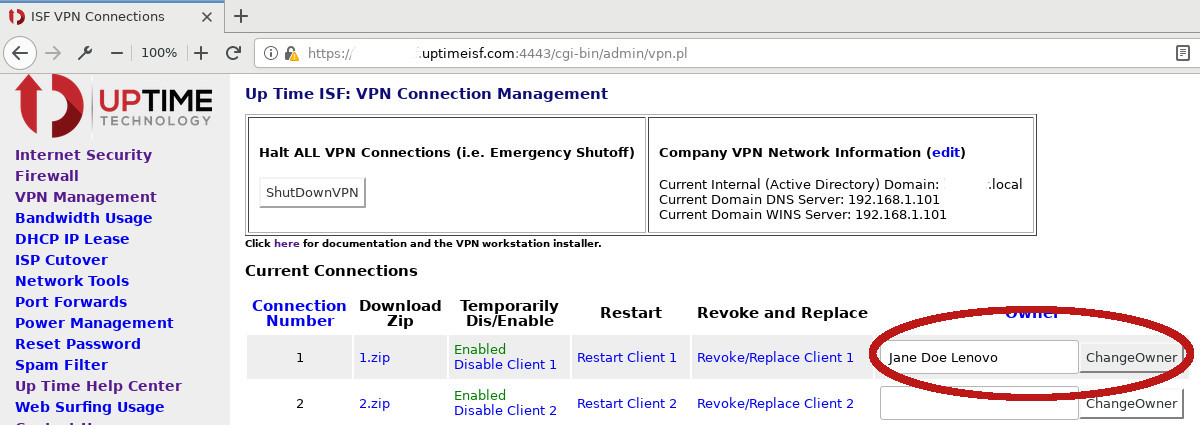
You will see a list of available client connections (by number). If
this is a new connection, find a connection where the Owner field is
blank. If you are replacing a connection, delete the current
information in the Owner field. Enter BOTH name of the person and the
type of machine they will be using. For example:
Jane Doe Lenovo
Click the Change Owner button.
This is a crucial step. If that machine is stolen or compromised, we
can revoke that one connection and everyone can continue to work. If
we are unsure which connection was compromised, we will have to revoke
ALL of them immediately (potentially cutting people off
mid-connection) and then re-issue certificates to everyone.
(Table of Contents)
C. Revoke/Replace the certificates/keys
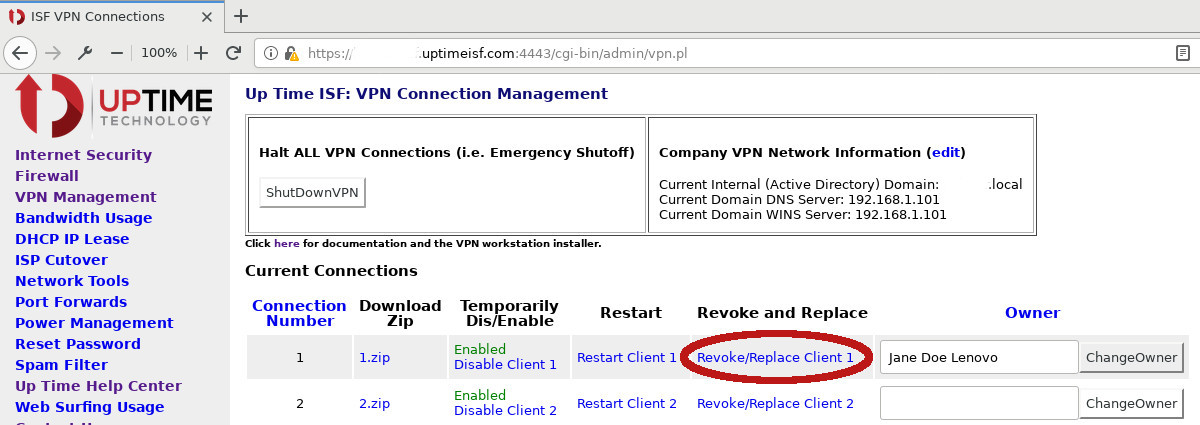
ALWAYS Revoke/Replace, even if this is just replacing the same
connection (say due to re-installing the OS of a laptop). The
certificates have a 3 year life time and Revoking/Replacing resets
that clock every time. Even on a new install, Revoke/Replace as you
often don't know how old the initial certificates are. Additionally,
Revoke/Replace locks out any stray certificates, which is always a
good thing.
(Table of Contents)
D. Create a Connection Password!
It is vital in protecting the office servers and client and financial data to create
a connection password. If this computer/laptop is stolen or compromised, the thieves/hackers
can simply copy your connection information to their machine and immediately access the
office network and data. This is true even if they don't know your Windows Login password.
It is crucial to your office securiy to put a connection password on
this VPN.
If you do not want to set a password, then skip to E: Download and Unzip
Underneath the zip download link click the "Set Password" or
"Change Password" (depending if the connection has a password or
not):
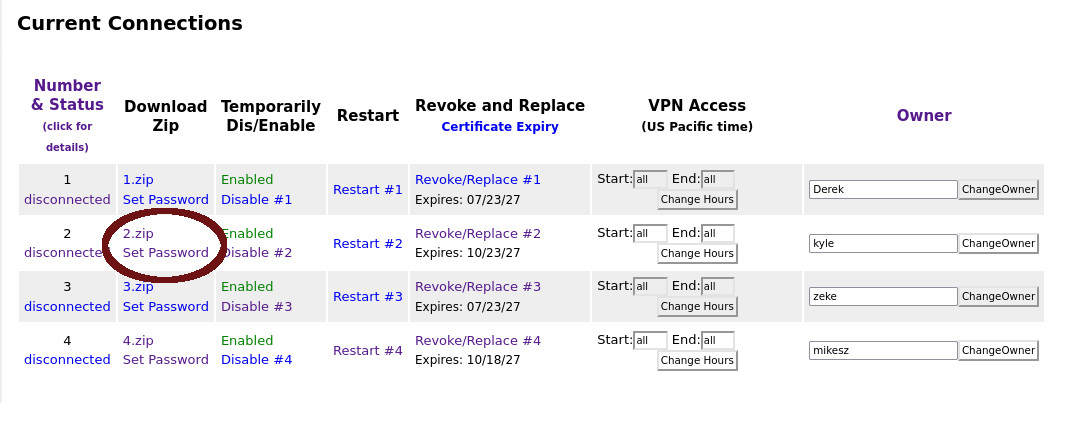
You then have two options. You can create the password for the user and then tell them. NOTE! They cannot change it once it is assigned, only an ISF Firewall Admin can initiate a password request.
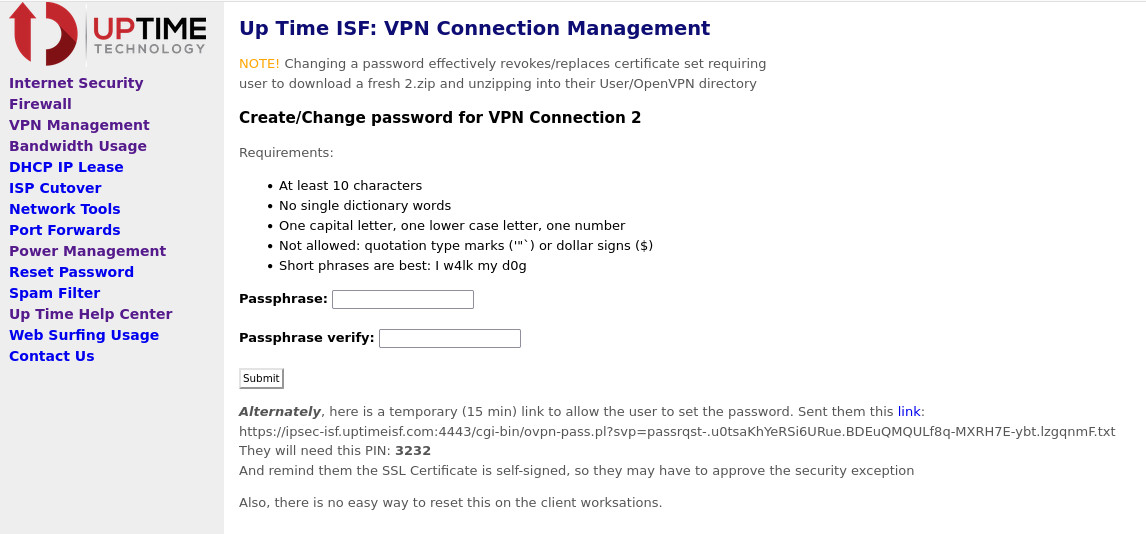
Or you can cut-and-paste the link provided and email the user (or
put it in their browser if you are on a remote session with the
final end user). They will need the PIN, do not send the PIN and
the link in the same communication (say email). If you email the
link, then text or voice call them with the PIN. They can then
fill out the password form themselves. This is the preferred
method as their password is then private.
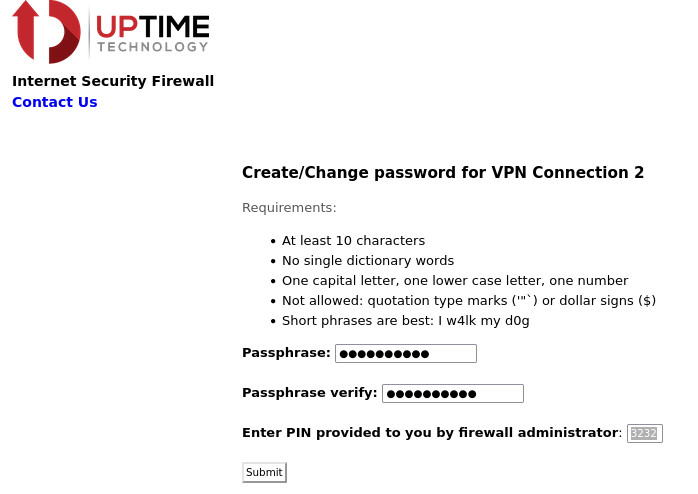
If that is successful then they will be given a download link for the certificate bundle and can follow the directions in the Unzip
section below.
E. Download and Unzip
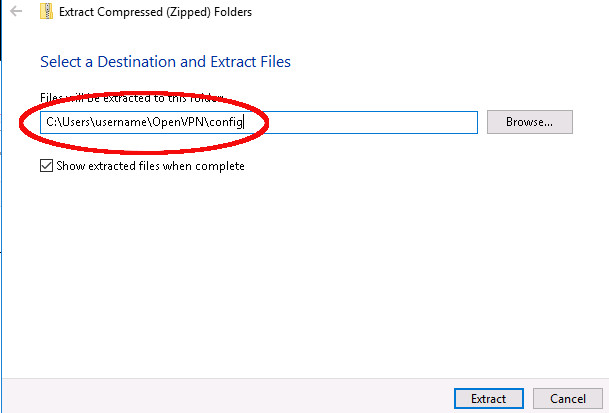
Click the correct X.zip link (2.zip for example) and unzip into thedirectory the installer showed you (likely C:\Users\username\OpenVPN\config,
where "username" is the actual username of the logged in user).
When extracting/unzipping, replace "username" with the current user's login name
V. Cleanup and VPN icon Configuration
A. Remove the zip file and install file
Delete the zip file and vpn-install.bat files (and remove from the Recycle Bin)so there are fewer copies of those sensitive files running around. Remember if the
zip file is NOT password protected and could be used to access the office.
B. Optionally Configure SysTray VPN Icon
The SysTray, the place where the small icons are stored near the clock
on the bottom right of your desktop, usually has so many icons they
don't show them all. There is a small Up Arrow that will show you all
of the icons in an expanded holding area. The VPN icon may move back
and forth between being on the task bar and being in the holding
area. If you want it to always appear next to the clock, click that
Up Arrow button and drag the VPN icon down to the task bar near the
clock.
You might also just want to verify that OpenVPN-GUI will start on
Windows Login. RIGHT click the VPN Icon in the systray near the clock,
choose Settings... Then make sure the box is checked that says:
Launch on Windows starup
(Should be the default, but good to check before production deployment.)
VI. Test the Connection
If you are outside of the office network (including the office WiFi)try to connect.
A. Connect to the Office
Find and double click the OpenVPN GUI icon in your system tray (near
the clock on the bottom left of your desktop, you may have to click
the Up Arrow to find it in the holding area, it should be a screen
with a very small padlock on the left). It will turn yellow
while it negotiates and authenticates to the ISF at the office
(anywhere from 5 to 45 seconds). If that is successful it will turn
green indicating you are connected to the office as if you had sat
down at a desk there and connected to the WiFi or plugged in a
wire. You may use any shared files from the server as if you were in
the office. Most database programs should work and you can remote
control any machine in the building to which you have permission and
access information.
If your shared drives don't show up, it is likely they were never
configured. Those settings are unique to each company and have to be
manually set up in most cases. Call your on-site IT support, or Up
Time, for additional help.
If the icon does not turn green in a reasonable time (in a minute or
less), or errors out, please verify you are connected to the internet
(and not the office network or office WiFi) by surfing to a reliable
site. If you are connected to the internet, please call for support
and we will figure out what went wrong and get you up and running:
(206) 547-1817.
(Table of Contents)
B. Disconnect if you are not actively using the VPN
We urge you to keep the VPN connection turned off if not in active use
as that opens the office network to more risk (if you get a virus, it
could run down the VPN tunnel and infect the office servers, etc).
Close the VPN connection after you have saved all your work by RIGHT
clicking the VPN icon in the SysTray and choosing Disconnect. You can
also DOUBLE click the VPN icon and click the Disconnect button.
Table of Contents
